Blocking "not entitled" sessions
Overview
Each NG Firewall license provides protection and filtering for a specific number of hosts. Any host in excess of the allowed number will be automatically bypassed, meaning that it is not subject to any filtering or protection by layer 7 applications: Web Filter, Application Control, and so on. This also means that any bypassed device will have unfiltered and unrestricted access to the internet. NG Firewall refers to this automatic bypass state as "not entitled".
If you would prefer, you can use Tags and Triggers to block all internet access for unentitled hosts.
Please note that this approach may not be 100% reliable! If you are consistently exceeding your license count, we recommend upgrading your license instead.
The Alert which enables this configuration
Under Config > Events > Alerts you will find a default alert rule labeled "License limit exceeded. Session not entitled". This alert is the basis for this blocking setup.
Under Config > Events > Alerts you will find a default alert rule labeled "License limit exceeded. Session not entitled". This alert is the basis for this blocking setup.
Tagging the not-entitled traffic
First, we'll create a new Trigger to apply a selected tag to the host. In Config > Events > Triggers:
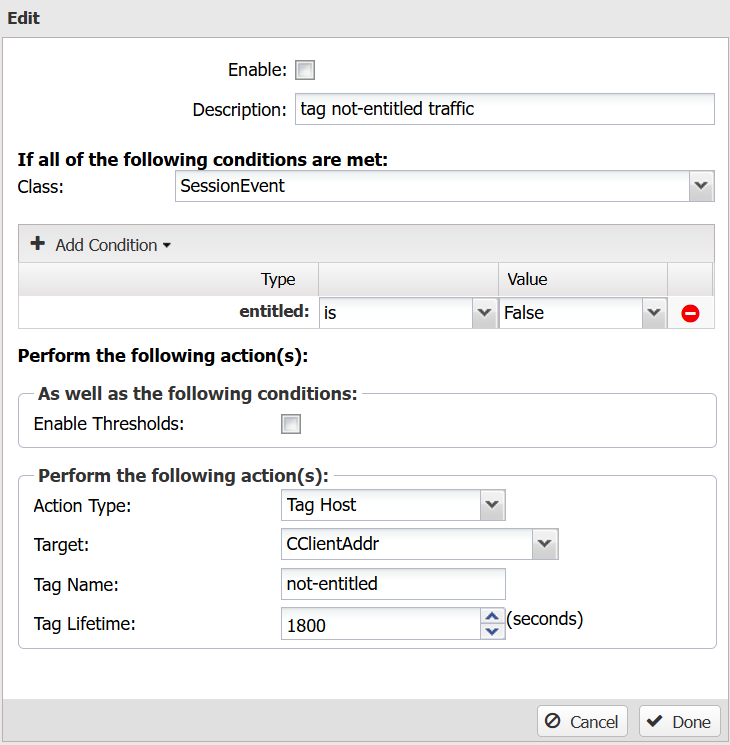
- Click Add
- Add a Description so you know what the trigger is for
- Set the Class to SessionEvent
- Add the condition entitled and set its value to False
- Set the Action Type to Tag Host (meaning that we'll tag the unique IP in question)
- Set the Target to cClientAddr (meaning we will tag traffic from the IP address whose traffic triggered the initial alert)
- Set the Tag Name; this can be anything you like, but we recommend using a unique tag that won't be confused for anything else
- Set the Tag Lifetime to a value expressed in seconds; we recommend at least 600 seconds (ten minutes)
- Click Done
- Click Save
Setting up blocking behavior
Next, we'll create the rule that blocks traffic with the specified tag. Go to Config > Network > Filter Rules to create your blocking rule.
Next, we'll create the rule that blocks traffic with the specified tag. Go to Config > Network > Filter Rules to create your blocking rule.
- Click Add
- Add a Description so you know what the rule will do
- Add the condition Client Tagged and set its value to the tag you selected in Step 7 above
- Set the Action to Block
- Click Done
- Click Save
Have more questions? Submit a request
Comments
2 comments
Please sign in to leave a comment.
Is this link up to date?
I am currently using Build: 14.1.0.20181130T105219.472bdadfc6-1stretch
it's slightly different vers what i actually see and some options are missing.
Kim,
I can see what you mean and I have confirmed that everything is up to date. You will notice some minor visual differences and we will be updating the screenshots shortly.